Tag Archives: photo editing

Multiple Seasons

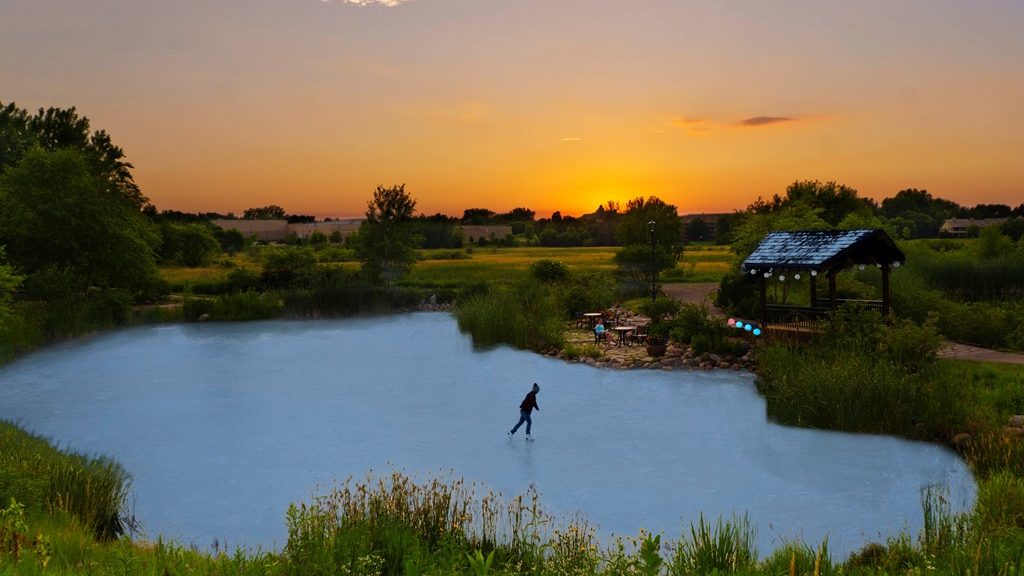
How do you get a picture that is impossible to photograph? It requires planning, multiple photo shoots, and post processing. The picture above didn’t start out as seen above. My original intention was to photograph my daughter ice skating under a beautiful sunset. On a few occasions we headed to a nearby park where a small pond is kept clear of snow for an intimate skating experience. Unfortunately the sky didn’t cooperate for any of those nights and soon after this photo was captured, the ice began to melt eliminating the possibility of the photo I had envisioned.  On the night this photo was take below, we headed to the park as the sky was mostly cloud covered but there were peaks of sun. If one of the patches of clear skies was in the right place near the horizon at sunset, the colors could be incredible over the ice rink. It was the night of the Superbowl and my wife was a part of the halftime crew in Miami so we hurried to be home in time for the game. Unfortunately the sky didn’t cooperate with the grand sunset I was hoping for and no further opportunities presented themselves that winter.

Winter and ice skating scene

We took many photos anyway since we were there and practice can always help. Over the course of the next few weeks, as I realized the opportunities had passed, I had an idea. What if I overlaid this frozen pond on a beautiful summer view of this same place? Almost immediately I couldn’t wait to try this and see how it would turn out. There was no way in the world I could ever photograph such a scene. Thankfully I had carefully paid attention to where I was standing when I took the initial pictures so I could return to the spot and get summer shots from the same perspective. This is critical when combining multiple pictures over different days, months, or seasons. Now I just needed to wait for summer.

Summer photo for foreground

It was the 4th of July holiday weekend and things were fully growing creating a green landscape for the next part of my project. There were clouds floating through the sky so I expected the sunset to be beautiful. Again we headed to the park, this time to capture a summer sunset scene. As the sun approached the horizon, the clouds dissipated. Now what? I decided to continue with the photo shoot and at least capture the dark green of early July. We may have to return yet again to capture a striking sunset. Getting setup in the same location I photographed the ice skating version from, it was now time to wait for the sun to drop near the horizon. As daylight began to dwindle I snapped a few photos adjusting first for the foreground (above), then midground (below), and finally for the setting sun (two photos below). Cameras are not able to capture each of these areas the same as we can see them so some blending is necessary.

Summer scene used for midground

Several weeks later I put these into the computer and did a quick combination with the ice skating picture and the photo just below that to see if it was interesting enough to continue processing this idea. It took mere seconds for me to decide that I should continue as the idea was so interesting. Over the course of a few hours I started with one summer photo and the ice picture. As I worked to blend these together I realized more images of the summer sunset would be needed to really give the vision as portions of each had some dark details. In the end there were 4 photos from the summer shoot blended to get the sunset and surrounding area closer to reality. Once these were done I added in the winter photo for a total of 5 pictures to create the top image. I ended up using the roof of the covered bridge from the winter scene as I thought it provided a better balance to the overall picture. While it may seem like a fairly simple combination it took many hours of planning and photographing to get the scenes I was looking for along with a couple of hours to combine them for the completed image.

My expectation is that people will initially look at the photo and think “that’s nice” and almost move on before realizing something doesn’t look right. That then requires a closer examination to figure out that the water is frozen but it’s a summer scene. At that point they are now invested in the picture and search for the different details to find out which seasons each piece represents. Isn’t that often the goal? To have people brought into the image? I have some more ideas that I want to play with down the road similar to this now that I’ve entered into this realm. This really kind of messes with my mind to see two very different seasons added into one picture.

Summer scene used for sunset

Photography Experiment–Editing

Sunset Over the Blue Mounds

Nearing the end of the photography experiment Monopoly Board, I have been practicing with editing my photographs. Here is a beginners guide to photo editing by Peter Carey which is the basis for my photography experiment board. Photo editing seems to have a negative connotation to some as they think it means photo manipulation which I consider to mean adding or subtracting elements in a photograph to produce a final picture that is not the actual scene. For me photo editing is the equivalent to photo processing which has been done throughout the history of photography. We just use computer programs now instead of dark rooms.

To accomplish this I have used information from books, videos, and webpages to increase my learning on how to edit a photograph. The difficult and simple part is that everyone seems to have their own preference and style on how to edit a photograph. This makes it difficult because there is no one correct way to achieve an  amazing final photograph. The simple part is you can process your photos in a program of your choosing to create a final picture as you remember how it looked when you took it. I choose a picture I took at Blue Mounds State Park back in September for this post. Let’s see how it turns out.

My first program of choice is Adobe Camera Raw because it works with a number of their programs and edits a picture without permanently changing it. I tend to shoot most of my pictures in both JPEG and RAW so in order to get started I have to convert the RAW image into a DNG using Adobe DNG Converter which then can be opened in Adobe Camera Raw. Both Adobe DNG Converter and Adobe Camera Raw are free downloads if you already have purchased one of their other photo editing programs such as Adobe Lightroom which is used by many photographers or Adobe Photoshop Elements or Adobe Photoshop which is the ultimate photo editing tool but is also the most expensive. On to my photograph.

_DSC0596-2

Here is my photograph without any adjustments made so it is as Camera Raw opened it after changing the default settings back to zero. Camera Raw automatically adjusts the blacks, contrast, and brightness by default. Below you can see how it looks inside Camera Raw. As you look at the histogram in the upper right corner you can see that all of the colors are showing up without being clipped by the black triangles in each corner of the histogram. If there were a color being clipped one or both of those triangles would show up with a color other than black.

Starting Image

My first adjustment is to the white balance. By default it is set to ‘As Shot’. Usually I prefer a different white balance setting. In this case I selected between Daylight, Shade, and Cloudy. You can see each of those below. You can adjust the white balance to custom but I find this does not produce better results much of the time but I do use it on occasion.

Daylight  Cloudy  Shade

Daylight which is the first picture was the one I chose. It seemed the most accurate to what I remember the scene looking like when I took the photo. Next I move over to the lens correction tab and check the box next to enable lens profile corrections. I’ve already entered the lens I was using so it automatically makes distortion and vignette adjustments. These are pretty small adjustments for the lens I was using.

Changing Lens Profile

Comparing these two pictures you probably won’t notice much if any change but there was a mild adjustment to the distortion.

No Lens Correctin  With Lens Correction

My next adjustment is in the camera calibration tab. By default this is set to have the camera calibration as Adobe Standard. Standard is not what I had in mind when I took this picture so I change this to camera vivid most of the time.

Changing Camera Profile

You can see the comparison between standard and vivid in the photos below.

Adobe Standard  Camera Vivid

Now it’s time to move back to the basics tab and bring out scene to the best of my abilities. Instead of going through each step and making this post excruciatingly long, here are all of the adjustments I made in the basics tab. Exposure +0.50, Recovery 60, Fill Light 65, Blacks 5 which is the default setting, Brightness +25 which is a default setting, Contrast +50 which is a default setting, Clarity +91, and Vibrance +41. I didn’t automatically come to those settings. There was some back and forth because as you adjust one of those settings it affects the others so you have to go back and change other settings. After playing around with these adjustments for awhile you begin to get an idea of how to make the adjustments in order to create a photograph that is pleasing to you. That is the difficult part of photo processing.

Basic Adjustments

Here are the before basic adjustments and after. Now it looks closer to what I remember seeing the night I was taking these pictures with the rocks visible and the colors in the sky showing up more vibrantly.

Before Basic Adjustments  After Basic Adjustments

One final piece to this picture is the sharpness. in the detail tab I increased the sharping by 114 with a radius of 2.0, detail of 35, and masking of 50. This brought the clouds and rocks into a little more detail. Of course while doing this I realized the noise was beginning to climb so I adjusted the luminance to 36 to take out some of the noise.

Sharpening

A comparison of these is below. There may not be much of a noticeable difference as viewed on this post but there would be a difference in printed photographs.

Before Sharpening  After Sharpening

I’m still not sure that the exposure is high enough. Other than that, I’m happy with how this photograph looks. Let’s see how it looks by increasing the exposure or brightness a little.

A Few More Basic Adjustments

After increasing the exposure I decided to increase the exposure to +0.70 and the brightness to +46 because I decided to increase the contrast a little more to +70 and add a touch more vibrance +60. Let’s see how they compare now.

Before Final Adjustments  After Final Adjustments

I do like both of these but the increased brightness, contrast, and exposure are preferred when finally printing out a picture to display. My choice in vibrance level is debatable. So, let’s go back and compare the beginning picture to the final picture. I think the recovery should be increased to take some of the highlights out of the sky.

Starting Photograph  Final Photograph

Here it is with the recovery increased to 95. I think that does it. Now let’s take a look a a minor cropping.Increased Recovery

I probably should have started with cropping but now that the rocks are visible let’s see if a little cropping would improve this picture. I think that helps put more of the focus on the sky which is what I was trying to do in the first place because of the colors and interesting clouds. The rocks help to add interest because of the irregular patterns and add some sense of perspective overall. I think this gives a good example of how photo processing takes some time and requires multiple adjustments to give you a great final photograph.

Before Cropping  After Cropping