Tag Archives: Blue Mounds State Park

Roaming the Prairie

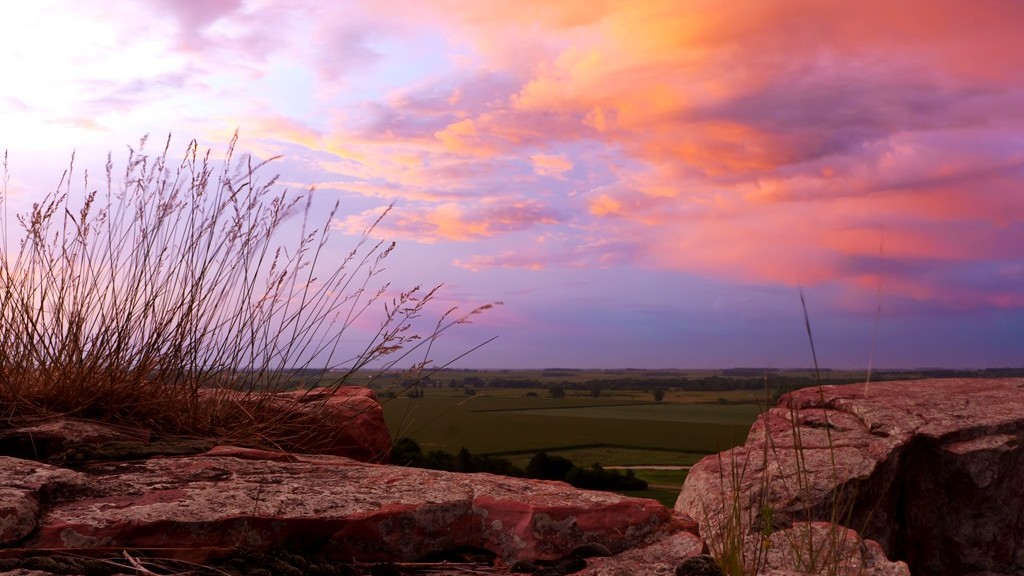
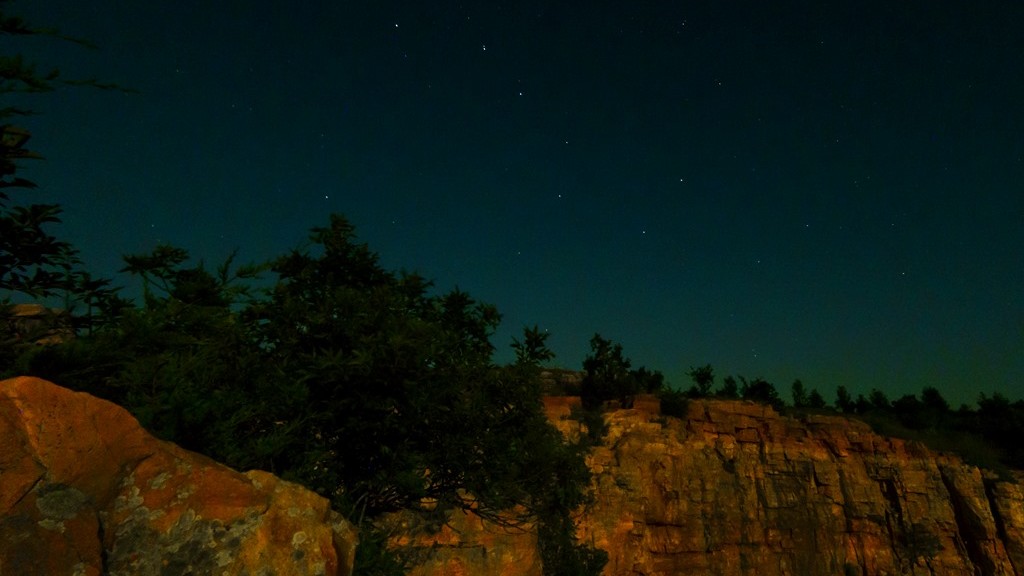
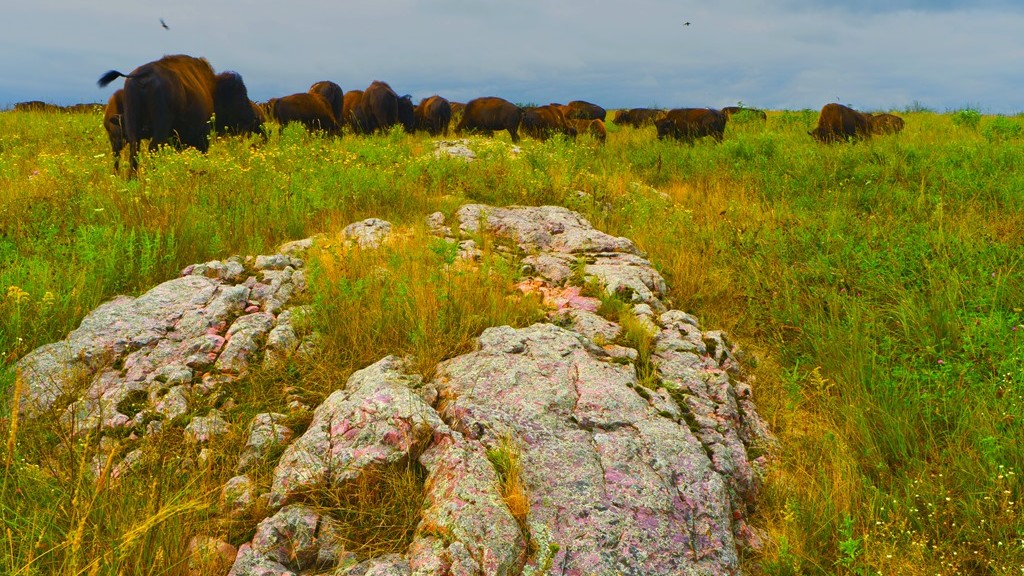
As summer began to wind down I ventured off to Southwestern Minnesota in search of the Prairie Fringed orchid while hoping to view the Perseid meteor shower from a prairie landscape. Unfortunately I was unsuccessful at seeing much of either of these. On my last morning there a local herd of bison started to move closer to my location. What an unexpected surprise! While they were closer, they still were pretty far away for some nice photographs. Still I had envisioned photographing bison as they worked their way around the mounds of stone scattered across this part of the prairie before beginning this camping adventure. Now it seemed as though there was a possibility of capturing those shots. It was about time to tear down the campsite so I focused on that as the bison were still quite far away. With each trip of gear to the car I would check on the herd. Eventually I lost them and figured they had moved on to a further portion of their grazing area. With my equipment safely stored in my car I glanced up to see people looking at something. The bison had worked their way much closer. Observing their direction for a few minutes I grabbed the camera and found a safe place to set up for some potential photographs highlighting the huge animals against the beautiful pink quartz exposed above the prairie.

The herd of bison moving closer

Sitting for what seemed like a long time a head poked up above the grass. And then another, and another until the entire herd was becoming visible. I chose a particular stone outcropping and just waited for these bison to work their way near it. As they meandered closer I began to get a little nervous. These are very large, powerful animals. While there was a fence between us, it would be quickly trampled through if these bison had motivation to run through it. There was one bison that seemed more nervous than the others and kept an eye on me. I kept an eye on that one too. At this point several of the bison were grazing near the rocks I had pointed the camera at. I began to shoot away trying different compositions and distances taking advantage of the situation. They continued to move and were out of my range pretty quickly and I figured I was done. Just waiting for them to be completely out of sight before I move back to my car.

A young bison grazing under the watchful eye of a much larger adult

While sitting there watching, the herd came back and once again surrounded the rock outcropping I was focused on. What luck and this time they approached from a different direction providing me with a few different compositions. Once again there was one of these bison which seemed to be watching me more closely than the others. Although this time is appeared to be more out of curiosity than concern as it would reach down to eat more frequently. This time they lingered in this area longer allowing me to not only get more photographs but to just watch from time to time. I was fascinated by all of the burs stuck to their noses. Do they feel them? Are they annoyed by them? How do they get removed from their noses?

Feeling more comfortable near these large animals this time it almost felt like I was among the herd. That’s when a photo session changes from great to an amazing experience. When they just continue on their mission like you’re not even there at close range. You get to see some of the details of an animal or its behavior not easily noticed from a distance. When you can hear their light grunts and catch a bit of their scent as they grab a mouthful of grass. It all tells more about an animal than looking at them from a distance. I may have missed the Perseids and failed to find a Prairie Fringed orchid but this encounter with a herd of bison made the weekend all worth any efforts needed for a weekend trip to the prairie.

Moving closer while keeping a watchful eye

A Day on the Prairie

After spending the night in search of Persied meteors blazing across the sky, I was awakened by a blast of wind on a calm summer’s night. This blast came from an approaching storm. Another hope for me while staying in Blue Mounds was to see a storm approach from the west over this mostly cultivated landscape. There was some excitement but the darkness would make it a challenge to get great pictures showcasing the prairie under a stormy sky. I got up and began to prepare for the sunrise which I was quite certain would not be visible due to the clouds from this storm. To my surprise the sun appeared at the horizon and lit up the sky creating a beautiful beginning to what would be a warm summers day on the Prairie. My goal for the day was to explore nearby Touch the Sky Prairie for Prairie Fringed orchids. They had been spotted a few weeks earlier and my hope was to see and photograph this orchid adding to new native orchids found this year.

Monarchs foraging on Blazing Stars

The sun continued to move higher in the sky going in and out of clouds from the storm that continued on its trek towards the south. Most of the storm was a state away. It’s amazing how far you can see from a high point looking out over the prairie and farmlands. Taking a short break to enjoy a little nourishment and dry my feet from the heavy dew and quick shower from the mornings walk I headed to Touch the Sky parcel of the the Northern Tallgrass Prairie a few miles away. There are some nicely mowed trails through this prairieland allowing you to explore this preserved land without much difficulty. Beautiful liatris bloomed all over the prairie providing a great source of food for the many monarchs fluttering about but no orchids in sight. Throughout the day I continued to search different areas of the prairie for what promised to be a stunning orchid. By late afternoon it was time for a break, and maybe a nap.

Turkey Vulture preparing to take off

Storms were predicted for late in the day. The sun had heated the air thoroughly during the afternoon and humidity added to the warm sun to create a bit of a stifling atmosphere almost sure to produce some nice thunderstorms. I had an area in mind to photograph these storms and thought it was probably time to get there. On the way, there were a couple of vultures sitting on rocks. I typically don’t want to photograph them but they were in such an easy spot and because of the heat had little interest in flying away. They are interesting birds up close with features that are often difficult to see from the air. Taking a trail to a better vantage point, a storm was out over the horizon approaching from the west as I was hoping for. Unfortunately the sun was getting close to setting so the pictures of prairieland underneath some interesting lightning would have to wait for another time. As it got closer, I moved towards my campsite for shelter and continued to take pictures. Most of the lightning was cloud to cloud reducing the chance for a nice photo. I did manage to get the one you see below which includes one of the teepee’s available for rent at Blue Mounds State Park. If you look closely there are a couple of lighting bugs flying around also creating the photo I call camping with lightning bugs. So while I didn’t find the orchid I was looking for, I did enjoy so much of what the prairie has to offer on a warm summer’s night.

Camping, Storms, and Fireflies

In Search of the Perseids

Every August I like to go somewhere with dark skies to view the Perseid Meteor shower. For the last couple of years I’ve either ventured to the North Shore of Minnesota or Voyageurs National Park. This year I wanted to try something different so I began looking for a place in Western Minnesota. Blue Mounds State Park came up as a potential spot as the skies should be dark enough and I’ve been wanting to return and explore this park again. I visited this interesting park in 2014 and enjoyed my time there. Having a little familiarity with it would help in picking out a spot to photograph meteors flying through the sky so that would be my destination for this years Perseid’s.

A nice, clear sunset leaving a clear sky for stargazing

Returning from Isle Royale National Park in July left me pretty unmotivated because that was such a great experience for me but my vacation time was now used up for the year leaving me with little desire to grab the camera and go out photographing. All that was left were my homeowner projects which I really needed to get taken care of. I just didn’t have any desire to. Now a trip to see a meteor shower at in a beautiful place was on the calendar and my energy began to return even though it was only for a weekend. And not a long weekend at that. While planning this little trip and preparing my camping gear once again, a thought arose. What would the moon phase be during this meteor seeking weekend? Looking at a astrological calendar showed that a nearly full moon was expected with moon rise shortly after sun set. That won’t work! Should I still go? Somewhat deflated I settled on keeping my plans and decided to go anyway. Maybe there would be a nice storm which is something else I wanted to photograph over the vast prairie in this area.

Moon rising above the horizon

While driving to Blue Mounds State Park I explored some different options for taking advantage of the bright moon light. Where could I set up and get some unique photographs? The moon can provide some interesting effects to the landscape which I’ve been experimenting a little with. As the sun was setting I hiked out to a spot near cliffs of pink stone which hopefully will illuminate well from a bright moon. Getting into place and setting up my camera as the sky was becoming dark, I was hopeful for a few beautiful pictures. Soon after the moon rose above the horizon and my night of photographing began. I tried a couple of compositions from panoramas of the horizon as the moon broke above to placing some of the pink rocks in the foreground. As the moon rose higher in the sky I turned the camera towards the now brightened cliffs to see how the moon would shine off of those jagged rocks. The big dipper did cooperate and was shining just above the horizon above some of these interesting cliffs. Unfortunately I didn’t really capture pictures that I was hoping for but it was a fun night to be out there with the occasional pack of coyotes howling off in the distance. That is until the wind pick up!

A moon lit landscape

Artistic Photos

Moss Covered Rocks

When going out to take pictures I generally stick to the landscapes and/or wildlife as that is what I enjoy the most but from time to time I see textures or colors together and attempt to capture them. On a recent trip to Blue Mounds State Park I took several artistic pictures from a few places that I saw interesting combinations so here are a few of those.

In the picture above I thought the softness of the water and moss growing on the rocks contrasted nicely with the hardness of the fallen leaves. In addition, the colors contrasted beautifully together. Taking this photograph at another time of day could have given better light to really create a great picture and set off the colors.

Between the Rocks

While exploring the park I came across a number of places where the rocks were split apart exposing different patterns and colors. This was one of more unique pictures with the pinks of the rock closest to you and more of a green tone which is amplified by the shading of the sunlight as you look through this crevice. Also, I liked the text of the fallen rocks as you peak through this photo.

Growing in a Rock

Another great contrast with one little flower managing to survive in a crack in the stones. Also, the purity of the white flowers against the irregular cracks in this hard, pink mottled stone add to the contrasts that I liked about this image.

_DSC0921

Can you feel the warm breeze blowing when looking at this photograph? The grasses in the background are at an angle along with milkweed seeds all angled in the same direction and the bright sunlight illuminating it all.  When I look at this picture I keep waiting for some of the seeds to fly off in the wind.

Roses are Red

When I saw the amazing reddish fall color in these roses I kept trying to find a way to bring that out. The sun showing through these leaves provided the perfect light to bring these brilliant colors out which contrasted beautifully with the still green grasses surrounding this plant. In addition, the bright sunlight highlights the serrated edges of the rose leaves against the straight blades of the grasses making for a nice texture contrast.

Analyzing my ‘artistic’ photographs there are usually two main elements that catch my attention: contrasting textures and contrasting colors. With that in mind, I wonder how some of these may look as black and white photographs eliminating the contrasting color aspect?

Black and White Version

  Colored Version

Seeing these two next to each other I really like the black and white version as well. Just focusing on the textures and evident wind makes for an interesting photograph.

Black and White Version

Colored Version

With this image the black and white version is not as interesting but still not bad. If I had focused on creating a black and white picture I would have taken it at a different angle to get the white flowers against the solid stone above them allowing the cracks to show through without being covered by the flowers and the flowers could contrast against the stone without the cracks taking away them.

Black and White Version  Color Version

  I was amazed at how much I like this photograph in black and white. Removing the color really gives a sense of peering in between these large rocks and shows the shapes and shadows in much more detail. This little addition to this post may be helping me rethink the idea of black and white photographs. I certainly did not plan on doing this with this post. Since I’m having so much fun with it let’s try the top picture.

Black and White Version

Color Version

No, this picture does not benefit from the conversion to black and white. It eliminates the effect the moss has which is one of the things I like about it. Definitely worth trying though.

I won’t even consider trying the rose picture because the purpose of that photograph is the bright red colors. Hopefully this was interesting to look over. It was for me to write it.

Photography Experiment–Editing

Sunset Over the Blue Mounds

Nearing the end of the photography experiment Monopoly Board, I have been practicing with editing my photographs. Here is a beginners guide to photo editing by Peter Carey which is the basis for my photography experiment board. Photo editing seems to have a negative connotation to some as they think it means photo manipulation which I consider to mean adding or subtracting elements in a photograph to produce a final picture that is not the actual scene. For me photo editing is the equivalent to photo processing which has been done throughout the history of photography. We just use computer programs now instead of dark rooms.

To accomplish this I have used information from books, videos, and webpages to increase my learning on how to edit a photograph. The difficult and simple part is that everyone seems to have their own preference and style on how to edit a photograph. This makes it difficult because there is no one correct way to achieve an  amazing final photograph. The simple part is you can process your photos in a program of your choosing to create a final picture as you remember how it looked when you took it. I choose a picture I took at Blue Mounds State Park back in September for this post. Let’s see how it turns out.

My first program of choice is Adobe Camera Raw because it works with a number of their programs and edits a picture without permanently changing it. I tend to shoot most of my pictures in both JPEG and RAW so in order to get started I have to convert the RAW image into a DNG using Adobe DNG Converter which then can be opened in Adobe Camera Raw. Both Adobe DNG Converter and Adobe Camera Raw are free downloads if you already have purchased one of their other photo editing programs such as Adobe Lightroom which is used by many photographers or Adobe Photoshop Elements or Adobe Photoshop which is the ultimate photo editing tool but is also the most expensive. On to my photograph.

_DSC0596-2

Here is my photograph without any adjustments made so it is as Camera Raw opened it after changing the default settings back to zero. Camera Raw automatically adjusts the blacks, contrast, and brightness by default. Below you can see how it looks inside Camera Raw. As you look at the histogram in the upper right corner you can see that all of the colors are showing up without being clipped by the black triangles in each corner of the histogram. If there were a color being clipped one or both of those triangles would show up with a color other than black.

Starting Image

My first adjustment is to the white balance. By default it is set to ‘As Shot’. Usually I prefer a different white balance setting. In this case I selected between Daylight, Shade, and Cloudy. You can see each of those below. You can adjust the white balance to custom but I find this does not produce better results much of the time but I do use it on occasion.

Daylight  Cloudy  Shade

Daylight which is the first picture was the one I chose. It seemed the most accurate to what I remember the scene looking like when I took the photo. Next I move over to the lens correction tab and check the box next to enable lens profile corrections. I’ve already entered the lens I was using so it automatically makes distortion and vignette adjustments. These are pretty small adjustments for the lens I was using.

Changing Lens Profile

Comparing these two pictures you probably won’t notice much if any change but there was a mild adjustment to the distortion.

No Lens Correctin  With Lens Correction

My next adjustment is in the camera calibration tab. By default this is set to have the camera calibration as Adobe Standard. Standard is not what I had in mind when I took this picture so I change this to camera vivid most of the time.

Changing Camera Profile

You can see the comparison between standard and vivid in the photos below.

Adobe Standard  Camera Vivid

Now it’s time to move back to the basics tab and bring out scene to the best of my abilities. Instead of going through each step and making this post excruciatingly long, here are all of the adjustments I made in the basics tab. Exposure +0.50, Recovery 60, Fill Light 65, Blacks 5 which is the default setting, Brightness +25 which is a default setting, Contrast +50 which is a default setting, Clarity +91, and Vibrance +41. I didn’t automatically come to those settings. There was some back and forth because as you adjust one of those settings it affects the others so you have to go back and change other settings. After playing around with these adjustments for awhile you begin to get an idea of how to make the adjustments in order to create a photograph that is pleasing to you. That is the difficult part of photo processing.

Basic Adjustments

Here are the before basic adjustments and after. Now it looks closer to what I remember seeing the night I was taking these pictures with the rocks visible and the colors in the sky showing up more vibrantly.

Before Basic Adjustments  After Basic Adjustments

One final piece to this picture is the sharpness. in the detail tab I increased the sharping by 114 with a radius of 2.0, detail of 35, and masking of 50. This brought the clouds and rocks into a little more detail. Of course while doing this I realized the noise was beginning to climb so I adjusted the luminance to 36 to take out some of the noise.

Sharpening

A comparison of these is below. There may not be much of a noticeable difference as viewed on this post but there would be a difference in printed photographs.

Before Sharpening  After Sharpening

I’m still not sure that the exposure is high enough. Other than that, I’m happy with how this photograph looks. Let’s see how it looks by increasing the exposure or brightness a little.

A Few More Basic Adjustments

After increasing the exposure I decided to increase the exposure to +0.70 and the brightness to +46 because I decided to increase the contrast a little more to +70 and add a touch more vibrance +60. Let’s see how they compare now.

Before Final Adjustments  After Final Adjustments

I do like both of these but the increased brightness, contrast, and exposure are preferred when finally printing out a picture to display. My choice in vibrance level is debatable. So, let’s go back and compare the beginning picture to the final picture. I think the recovery should be increased to take some of the highlights out of the sky.

Starting Photograph  Final Photograph

Here it is with the recovery increased to 95. I think that does it. Now let’s take a look a a minor cropping.Increased Recovery

I probably should have started with cropping but now that the rocks are visible let’s see if a little cropping would improve this picture. I think that helps put more of the focus on the sky which is what I was trying to do in the first place because of the colors and interesting clouds. The rocks help to add interest because of the irregular patterns and add some sense of perspective overall. I think this gives a good example of how photo processing takes some time and requires multiple adjustments to give you a great final photograph.

Before Cropping  After Cropping